How to Build a Tropical Garden Path in the Pacific Northwest
Create a lush tropical garden path in the Pacific Northwest with smart materials, bold plants, lighting, and simple design rules that work in our climate.
5/13/20268 min read
How to Build a Tropical Garden Path in the Pacific Northwest
A tropical garden path is one of the fastest ways to make a Pacific Northwest yard feel more intentional, more immersive, and more finished. Instead of looking at plants from the edge of the lawn, a path pulls people through the landscape and makes palms, broadleaf foliage, lighting, and layered beds feel like part of an experience.
In our climate, the best tropical-looking paths are not just decorative. They need to handle wet-season mud, fit the natural flow of the yard, and create enough structure that lush planting does not feel random.
Quick Takeaway: The Best Tropical Garden Path Formula
For most Pacific Northwest yards, the strongest tropical garden path combines:
A gentle curve instead of a straight utility line
A practical surface such as compacted gravel, stepping stones, or mulch paths
Bold foliage planted close enough to soften the edges
One or two focal moments: a palm, large leaf plant, pot, bench, or lantern
Lighting or contrast so the path still feels intentional in the evening
That combination creates a path that feels relaxed and lush without becoming sloppy or hard to maintain.
Why Paths Matter in a Tropical-Style Garden
A tropical garden is not only about individual plants. It is about how the space feels when you move through it. A good path slows the eye down, creates a sense of discovery, and allows you to layer foliage in a way that feels deeper than the actual yard may be.
A path can also solve several practical problems at once:
It keeps people from cutting across planting beds
It reduces worn, muddy walking lines
It gives the yard a clearer structure
It creates natural places for lighting, containers, and focal plants
In the Pacific Northwest, where wet soil and lawn traffic can quickly create soft spots, defining a walking route is both a design move and a practical upgrade.
If your backyard still feels more “unfinished patio” than tropical retreat, start with our guide to creating a tropical spring patio in the Pacific Northwest before mapping out your path.
Step 1: Decide What the Path Is Supposed to Do
Before choosing material, decide the job of the path. Most tropical garden paths fall into one of three categories:
1. Destination Path
This path leads somewhere specific: a bench, greenhouse, side gate, fire pit, plant display area, or patio. It should feel direct enough to be useful but can still curve to create a softer look.
2. Garden Stroll Path
This path is more experiential. It winds through plants, passes focal points, and makes the garden feel larger. This is the most “tropical retreat” option.
3. Service Path
This one gets you to hose bibs, garden beds, a compost area, or plant storage. It still needs to look intentional, but function matters first.
Best choice for most tropical backyard landscapes:
A destination path that borrows the softer shape of a stroll path. That gives you purpose without making the design rigid.
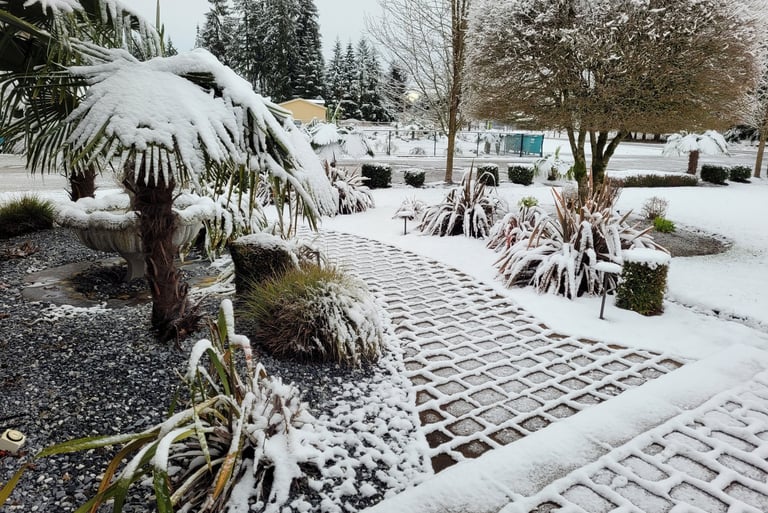
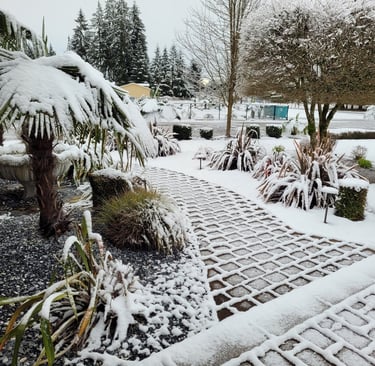
Step 2: Choose a Path Material That Fits the Look and the Climate
The material sets the tone. For a tropical Pacific Northwest yard, I would think in three tiers:
Budget-Friendly: Bark or Wood-Chip Path
A mulch path can look natural and relaxed, especially between dense planting beds. It is comfortable underfoot and easy to reshape later. Organic mulches also help suppress weeds and reduce exposed-soil splash near plantings, though they do need periodic refreshing.
Best for: Informal garden paths, low-budget projects, areas where you may change the layout later.
Mid-Range: Gravel Path with Edging
Gravel gives better visual definition than mulch and works well with tropical-looking foliage. It pairs especially well with dark edging, natural stone, or weathered wood borders. A gravel path feels structured without looking overly formal.
Best for: Main backyard walking routes, side-yard improvements, paths leading to a patio or greenhouse.
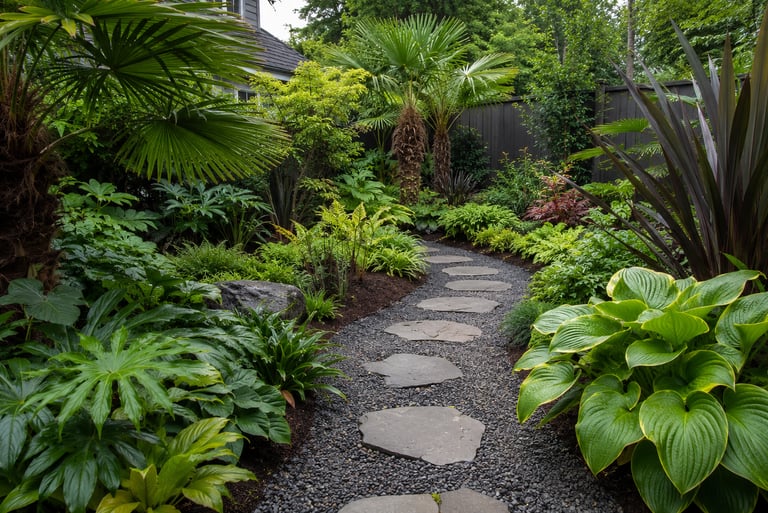
Premium: Large Stepping Stones or Pavers
Oversized stone or paver stepping pads can create a clean, resort-like feeling. Leave planting pockets around them so the path still feels planted into the landscape rather than dropped on top of it.
Best for: High-visibility entry routes, garden rooms, patio approaches, and areas you want to photograph for the site or social media.
For a cleaner edge between gravel or mulch and the surrounding bed, a flexible landscape edging kit can help keep the path shape crisp without making the design feel overly formal.
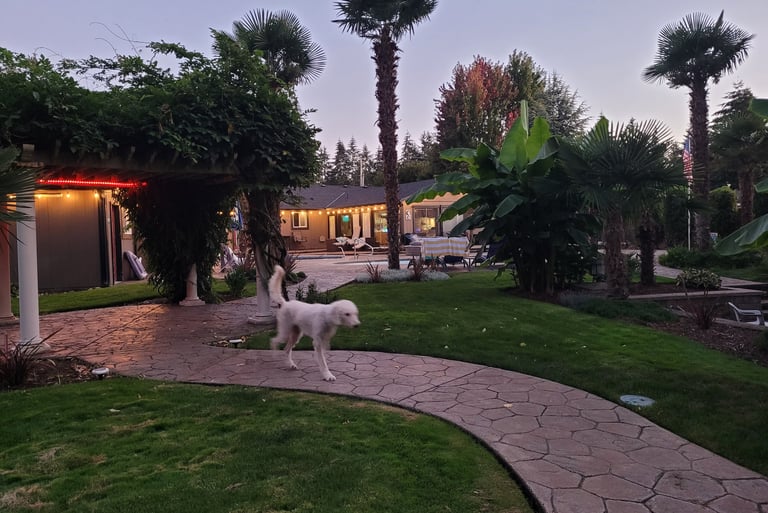
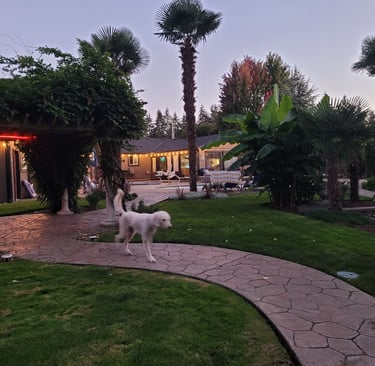
Step 3: Shape the Path for a Tropical Effect
Straight lines can work in formal landscapes, but tropical-style gardens usually feel more natural when the path has a subtle curve. The curve should not snake randomly. It should gently reveal the next part of the yard.
A strong layout rule:
Use a mild bend to hide part of the destination
Widen the path slightly near a focal plant or seating area
Avoid tiny wiggles that look forced
Keep the walking surface comfortable enough for actual use
For accessibility and comfort, paths that receive regular use should not be squeezed too tightly. Oregon State Extension notes that ADA-aware garden design uses pathways generously enough to improve access and usability.
Step 4: Plant the Edges Like a Tropical Corridor
The path itself is only half the design. The plants along its edges create the tropical feeling.
Use a Three-Layer Planting Approach
Layer 1: Low Edge Softening
Use plants that slightly spill or cluster near the path without taking it over. Examples might include:
Carex
Heuchera
Hardy begonias in protected areas
Hosta in shadier sections
Layer 2: Mid-Height Foliage
This is where the path starts to feel lush and enclosed:
Hardy hibiscus
Phormium
Astilbe in moister sections
Smaller bananas in summer display areas
Layer 3: Tall Structure or Destination Plants
Use these to anchor the view and create drama:
Windmill palms
Bamboo in controlled plantings
Cordyline where appropriate
Larger containers with bold foliage
The goal is not to line the path with one repeated plant. The goal is to create movement and rhythm: low, bold, tall, then low again.
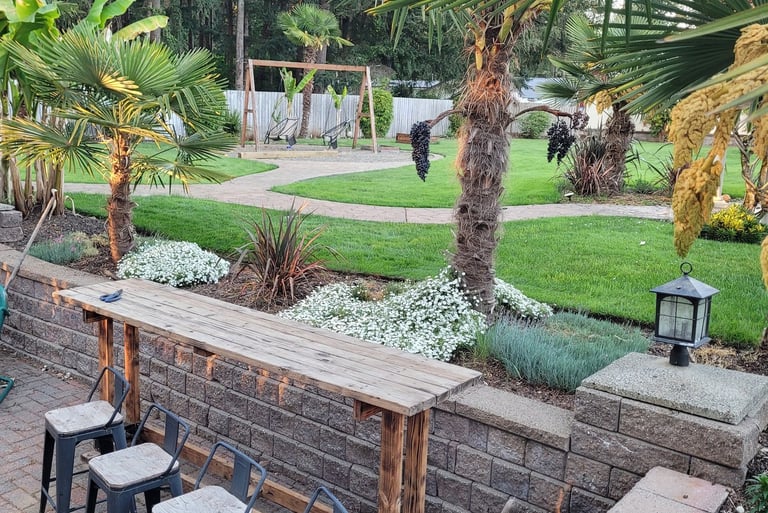
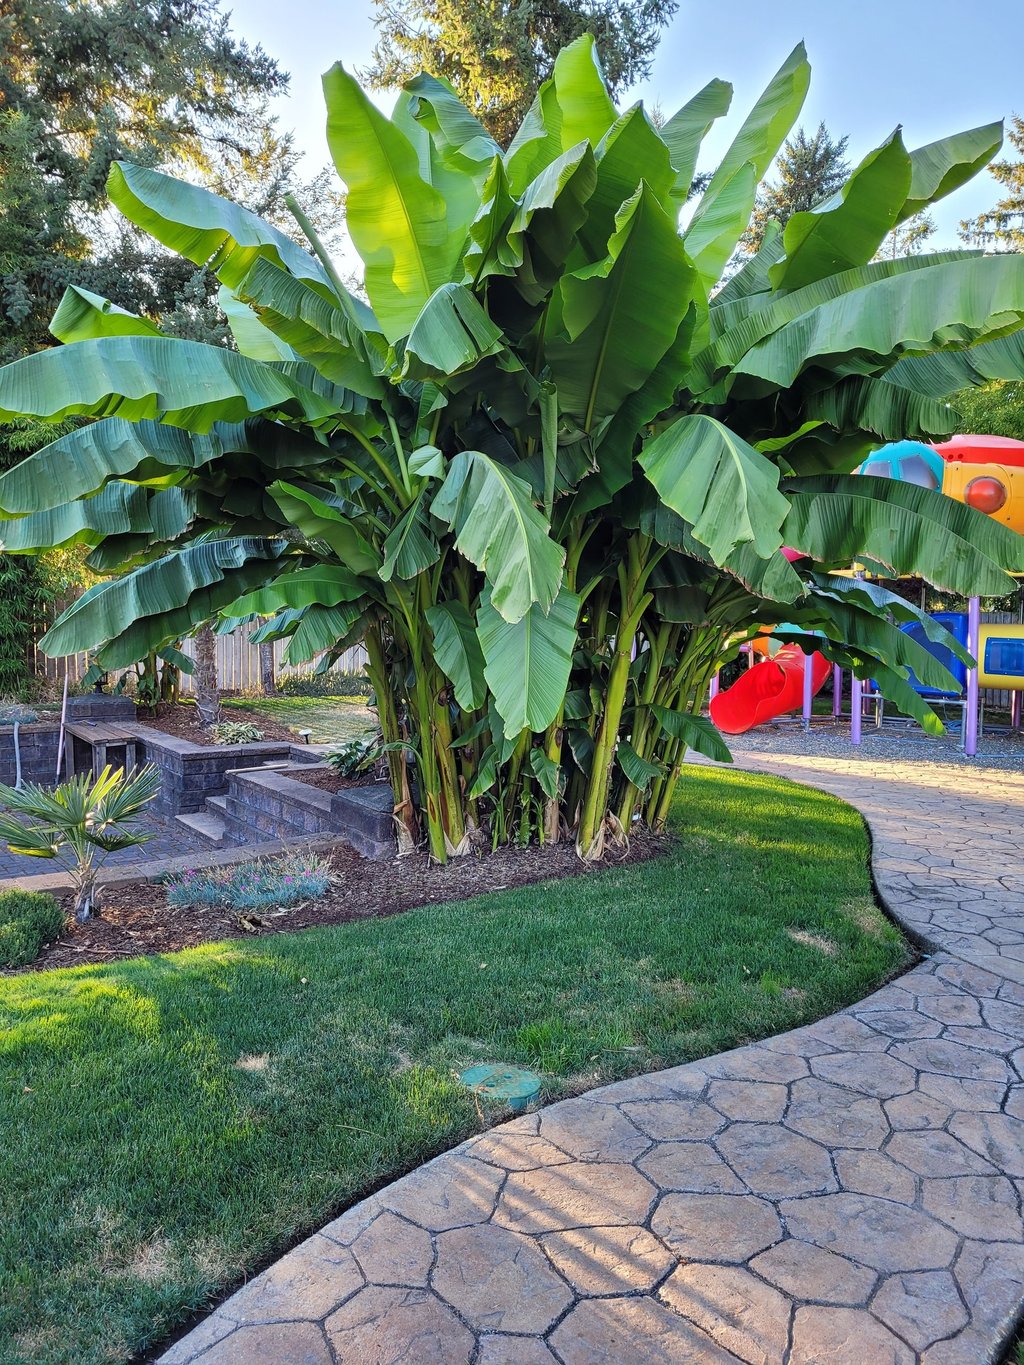
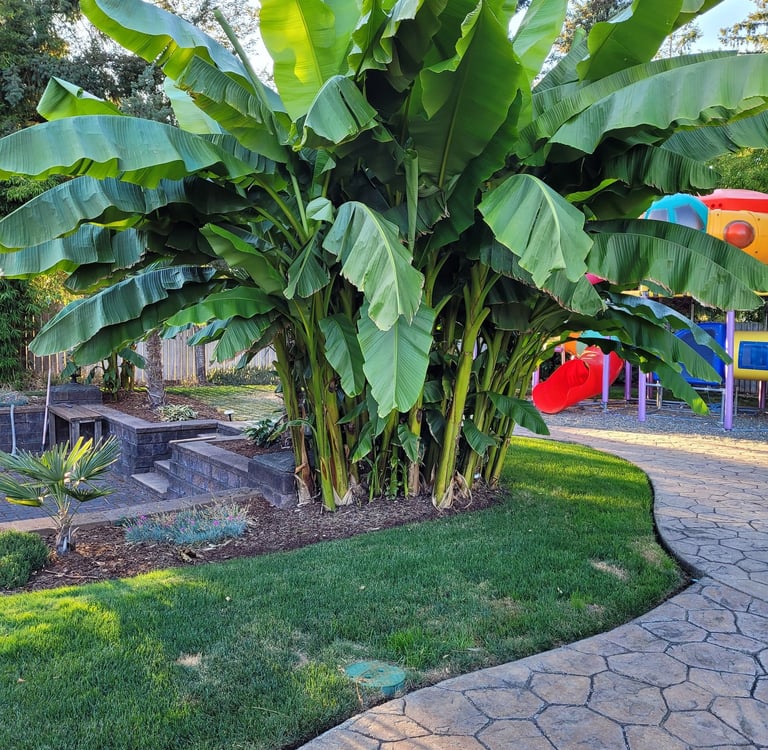
In our own Pacific Northwest landscape, paths make the tropical resort effect much stronger because they pull you into the yard instead of leaving the visitor stationary. Even a simple curved path between palms and broadleaf plants can make the space feel much more intentional. Our yard uses a mix of pavers and stamped concrete to may your way through the landscape.
For plant combinations that create a stronger layered effect around the path, see our guide to building a tropical patio corner in the Pacific Northwest.
Step 5: Add One “Pause Point” So the Path Feels Designed
A garden path should not always be just a tunnel from point A to point B. Add at least one pause point where the eye naturally stops.
Good pause-point ideas include:
A potted palm at the curve
A bench tucked into foliage
A lantern or low garden light
A dramatic plant grouping
A small boulder or sculptural container
A view toward a patio, fountain, or greenhouse
This small move makes the path feel purposeful rather than accidental.
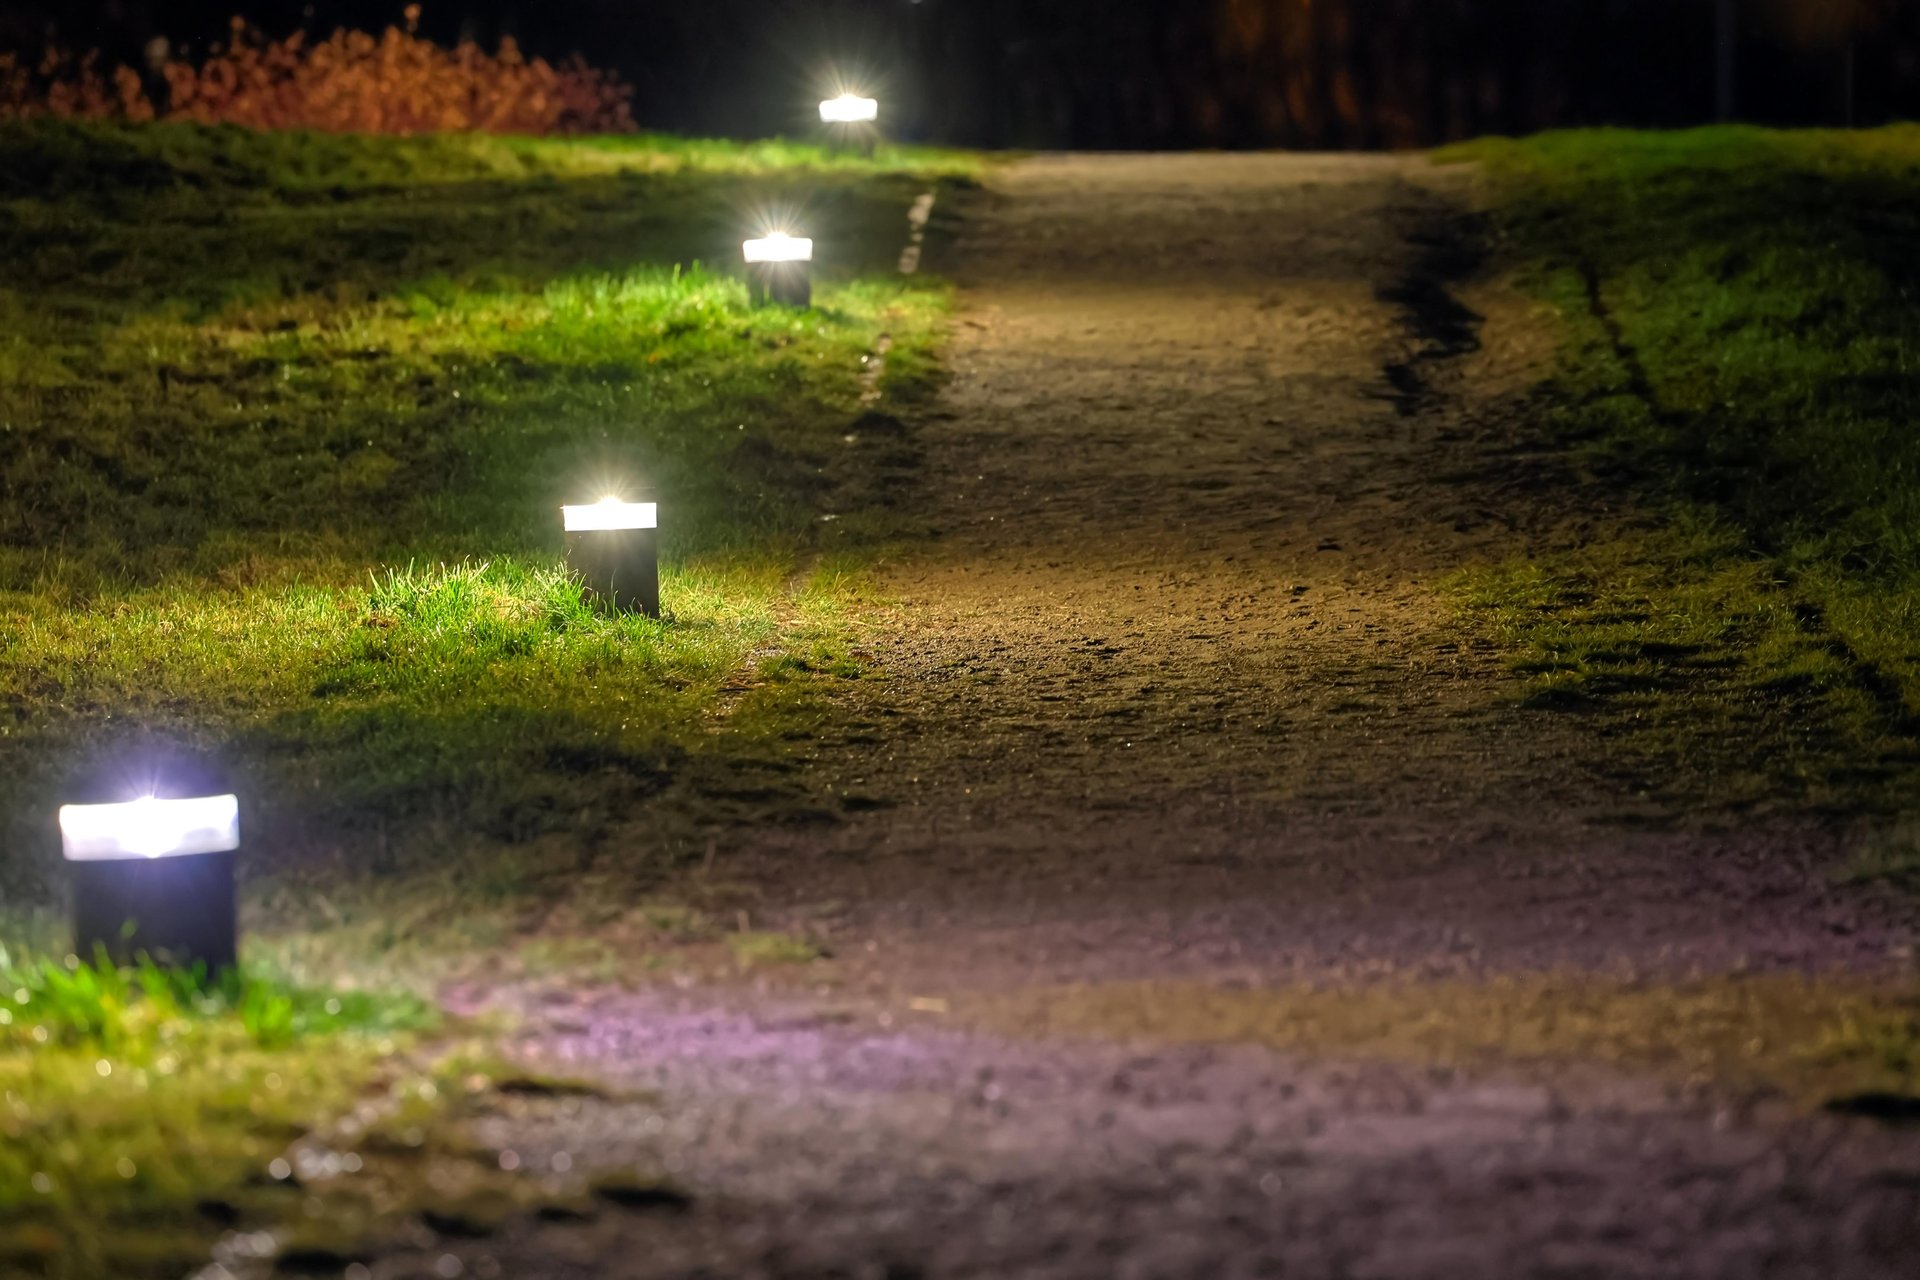
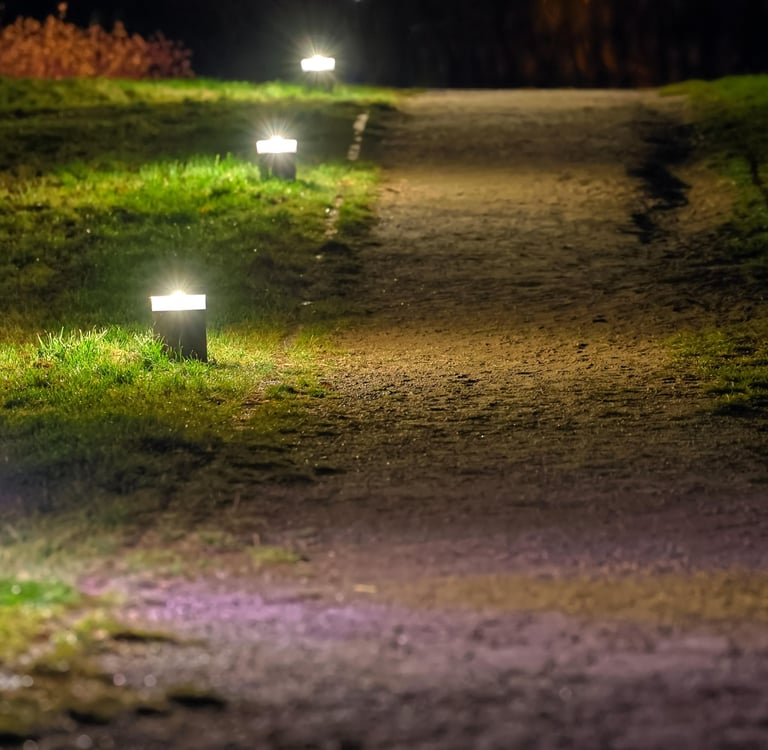
Step 6: Use Lighting to Make the Path Work After Sunset
Lighting is especially effective in tropical-style landscapes because large leaves, palm trunks, and layered foliage cast dramatic shadows. Along a path, lighting should be used sparingly and strategically.
A simple lighting plan:
Low lights along key turns, not every few feet
Uplighting on a palm or large broadleaf plant near the destination
Warm light rather than harsh bright-white glare
Enough visibility for safe movement, without making the yard feel like a parking lot
This connects naturally with your existing outdoor lighting content and gives the article a strong monetization opportunity.
For an easy evening upgrade, low-voltage path lights or warm solar pathway lights can help guide movement while adding a softer tropical-garden atmosphere.
Budget, Mid-Range, and Premium Build Options
Budget Path Build
Best for: A weekend refresh or testing the layout
Mark a gently curved path with a hose
Remove weeds and flatten obvious bumps
Add cardboard or sheet mulch where appropriate
Cover with wood chips or bark
Edge loosely with natural stone or planted borders
Add one focal container near the curve
This is the least expensive version and still creates a major visual shift.
Mid-Range Path Build
Best for: A more polished backyard route
Excavate and level the path area
Install edging for a crisp line
Add compacted base material as needed
Finish with decorative gravel
Plant both sides with layered foliage
Add 4–8 path lights depending on the path length
This is probably the best overall fit for many Pacific Northwest homes.
Premium Path Build
Best for: High-impact design and long-term permanence
Use large stepping stones, pavers, or natural flagstone
Create wider pause areas near seating or focal points
Add built-in lighting or low-voltage lighting zones
Design plant beds specifically around the path
Finish with statement containers, boulders, or a destination feature
This version gives the path the strongest “garden experience” feel.
Common Mistakes to Avoid
Mistake 1: Making the Path Too Straight and Too Narrow
A path that feels like a utility strip can flatten the whole tropical mood. Give it just enough curve and width to feel intentional.
Mistake 2: Choosing a Surface Before Deciding the Purpose
A decorative stepping-stone route may look great, but it is not ideal if you are regularly hauling tools, soil, or a wheelbarrow.
Mistake 3: Planting Right Up to the Edge Without Planning for Growth
Tropical-looking foliage often expands more than expected. Leave enough room so the path feels lush, not blocked.
Mistake 4: Ignoring Wet-Season Maintenance
Mulch paths may need refreshing. Gravel may migrate without edging. Plants may overhang more heavily in summer. A path works best when these realities are planned up front.
Mistake 5: Forgetting the Destination
Even a garden-stroll path should lead the eye somewhere. Give it a focal plant, seat, patio, or visual payoff.
Mini FAQ
What is the best path material for a tropical Pacific Northwest garden?
For most homeowners, gravel with edging offers the best balance of appearance, durability, and structure. Mulch is cheaper and softer; stone or pavers look more finished and premium.
Should a tropical garden path be straight or curved?
Usually, a gentle curve gives a stronger tropical-garden feel because it creates discovery and helps layered planting feel more immersive.
Can I build a tropical path in a small yard?
Yes. In a compact yard, even a short 8–12 foot walkway from patio to garden corner can make the landscape feel more composed.
What plants work best beside a tropical-style path?
Use a mix of low edge plants, mid-height foliage plants, and taller structural plants. The strongest look comes from layered massing rather than random single specimens.
Final Thoughts
A tropical garden path does more than connect two places. It changes how the entire yard is experienced. In a Pacific Northwest landscape, that matters because the right pathway can make palms, bold foliage, lighting, and layered beds feel like one cohesive outdoor room instead of separate pieces.
Start with the path’s purpose, choose a material that fits your budget and maintenance tolerance, soften the edges with layered planting, and add one focal moment that rewards the walk. That is how a simple walkway begins to feel like a tropical garden experience.
Once your path is in place, use our tropical outdoor lighting guide to make the same route feel warm and inviting after sunset.
Continue Reading: Related Guides
Contact Us
© 2025. All rights reserved.
Terms and Conditions
Affiliate Disclosure
Some links on this site may be affiliate links. As an Amazon Associate I earn from qualifying purchases.